Showing posts with label Recession Chic Teacher Ideas. Show all posts

Thursday, March 31, 2011

Kids Newspaper Sun Hats


Have you ever had those activities where you just simply had to do them every time the season rolls around? Okay, twist my arm, the sun is out and the kids can now make their new paper sun hats!
I can show you a great  modification for the boys that will give it that cool-factor, too!

How to Make Kids Newspaper Sun Hats:
Materials Needed: 
  1. Tons of Newspaper (Have parent start saving)
  2. Masking Tape
  3. Had Picked Flowers (from a nature walk)
  4. Phone Books (Optional is you would like to make the flowers)

The Process:
We do this in a small group activity so have the children standing and gathered around the the child that will go first.
  1. Have all the children drape large opens sheets of newspaper over the child's head. We tell them to be sure we can't see their face or head! The children love this part because they play peek-a-boo, and 'Guess-who' under the newspaper.
  2. I wrap a strip of making take around the child's head two or three times, once we have all smoothed down the newspaper. It is best to start about where the child's eyes are so be sure to hold them close to you during this process. We forewarn them it the tape will sound a bit loud but we are all looking out for them! We even have the group hold the child's hands to steady them because they won't be able to see for a few seconds.
  3. As a group we begin rolling up the loose newspaper up the the masking tape strip while it's still on the child's head. Ah, at last! Now they can see and have a wonderful new sun hat!
  4. Pix from Folding Tree!
  5. Flowers: We use old phone books for the flowers of these hats. This project can go on for quite some time decorating them! We actually have a hat parade for the parents so we don't mind taking our time. If you decide to paint them be sure to allow a few days to completely dry.
  6. Modifications for the Boys: While some boys didn't care for the same look the girls had, they did come up with a clever idea. The Fire Hat! We used the same process but didn't roll the back part of the hat and trimmed it to square it off. Kind of a paper mullet look, but paint it red and you have that cool-factor both boys and girls love.

Monday, March 28, 2011

Kids Phone Book Flower Craft

Photo from Simple Journey

Simple, easy and perfect for Spring! The kids love this craft because there is really no way to mess it up. The more colors and cuts the prettier they become!

How to Make Kids the Kids Newsprint Flower Craft:
  • Bio Color liquid watercolor
  • Newsprint or telephone book pages (this flower was made on newsprint)
  • Metal Brads
  • Hole Punchers
  • Lids (different sizes for children to trace)
  • Pencils
  • Light Colored Construction Paper
  • Glue
  • Glitter (optional)
  • Stamps and Ink Pads (optional)
  • Scissors

The kids love tearing the pages for their flower craft!
Craft Process: Allow kids to freely paint on phone book pages with Liquid Bio Color. After it is dry we have the children trace lids with pencils and begin cutting. We like to do this at a table while socializing and do it for as long at the children are interested. The more cuttings we get the more beautiful the effect. We usually dedicate one day for this project.
After we are finished, we punch holes in the centers of the circle clipping. Depending on how many clipping we have we dedicate on table during option time to hole punch. The children love mastering the hole punchers and are so pleased by their work.
More Water Coloring: We take a light sheet of colored contraction paper and allow the children to paint a beautiful place where they have seen flowers. The children love ink stamping butterflies and insects in the background as well.
The Finished Product: Sure, we take our time with this craft, even having two or three days to enjoy it. For the finale children merely stack the circle clippings from big to small then insert the brad. We attach them to their watercolor painting an add a brush of glue and glitter.
This art has a shabby chic look to it...very pretty!


Monday, March 7, 2011

Kids Crafts from Recycled TP Rolls

 
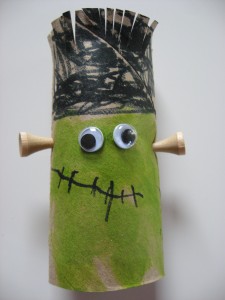
Who doesn't have tons of TP rolls laying around? I thought I would give an Honorable Mention shout out to some of the best ideas we have found out there for TP roll crafts. They kids will love them, parents will keep them, and you can finally clear out that huge box of them on the shelf!

Make a silly monster from recycled TP rolls.

Why wait for Halloween?

There are quite few more craft ideas for tp rolls on here, too! Love it!


Get buggy over this idea at Homeschool Creations

For my "Things That Fly" unit. Thanks Boy, Oh Boy, Oh Boy!

I Can Teach My Child teaches us a thing or two about penguins
For when they're caught being good! Thanks sugardoodle!
Make you favorite characters or family members into finger puppets!
All the buzz-zz-zzzzzz on John Deere Mom

Sunday, January 30, 2011

How to Get Free Classroom Materials


Now a days wallets are thin. We I used to not think twice about purchasing before-is now bought on sale.
And I mean a good sale.
I am learning to be a bit more recession chic when I realized people and businesses really do want to help. They just aren't sure how. It's up to us teachers and caregivers to stick together and do the  fancy footwork it takes to give our kids the best experiences. Here are a few tips I have learned.

How to Get Free Classroom Materials
* Make a list of things you need as well as things you want for the classroom. And hand it out to businesses. Let them know who you are and why you are asking. Follow up with a personalized thank you card. Nothing touches people more than a thank you card from the children.

*Then talk to the parents and find out what they do. Ask them about any materials such as paper, drawing materials, etc. that could be used the the classroom. Often times parents see materials thrown away at the job that the children would love-anything from Styrofoam to computer parts.

*Make a list of the businesses in your local area. I had a lumber yard near me one year that gave us bags of free sawdust. The children loved it in the sensory table. Most copy centers or art stores are willing to give scraps of cardboard or shredded paper. A bridal shop gave us tons of gorgeous scrap fabrics. I saved over $250 dollars on paper and fabric one year!

*Buy supplies in bulk from unconventional places. Team up with other schools or day cares and share the cost.

*Don't forget the garages sales or flea markets. Okay, this takes some time to do, but you'll feel so much better spending $5 on mildly used puzzles the $35 on brand new ones. The kids will never know the difference!

*Check with parents about the toys the children have already out grown. When every classroom does this there will be a plethora of toys to choose from. The only caution is if children recognize it as it once being theirs. This can start a, "You have a lot of es-plaining to do, Lucy!" We ask parents box up toys they will donate out of sight for a while before donation it. It truly does help.

    Donations some times means going out and doing the footwork yourself, and with the money you save, you'll feel so much better you did.

    Saturday, January 22, 2011

    How to Make a Kids Homemade Jump Rope


    With budget cut going the way they are it think it's about time teachers like us show off our Recession Chic skills. After all, gone are the days of petty cash and budgets.

    I want to thank Simple Kids Crafts for this easy peisy-lemon-squeezy video. I used to make these homemade jump ropes as a kid, myself. One extra tip I would like to add it to soak the rope on warm water for a few seconds after you make it. It will not only weigh down the rope, but straighten out those annoying kinks.

    Materials to Make a Kids Homemade Jump Rope

    • A long length of rope (It is better to cut it longer and adjust the size after you cut)
     
    • Two thin yogurt containers (just make sure the size comfortably fits in the child's hand)
     
    • Strong sharp scissors

    Procedure: Remove the labels from the plastic bottles and pierce the center of the bottom of each one.  Cut a long length of rope, usually three or four arms lengths (depending on the size of the child) and place the rope through the holes. Be sure to tie off each end and pull it taught.
    You can adjust the length of the rope by tying off the knotted ends in different places.